THE LOST ART OF KNITTING NANCYS Pictures and instructions on how to make and use them
(Viewed best in Internet Explorer. Some other browsrs may not be able to open the image files. Click on main site to browse 70 other topics ranging from exotic kaleidoscope designs to the strange world of lucid dreaming. NEW!!! Jump down to the Innovations knitting machine review.)
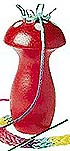
Whether
you call them Knitting Nancys, Bizzy Lizzys, knitting mushrooms,
knitting spools, corkers, peg knitters, knitting nobbys (or knitting
noddys) or knitting knobbys, these knitting devices all owe their
existence to the medieval lucet. The lucet is a two pronged fork with
a hole in the handle.
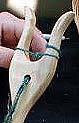
It's used by threading yarn through the hole then in a figure eight around the prongs. The yarn is laid above one of the figure eight's loops and the loop is picked up by a needle and carried over the top of the prong. The lucet is rotated one-half turn, carrying the yarn above the second loop, and the process repeated. The yarn trailing down through the hole is given a tug to draw the knitted braid down through it. The cords so produced where used as piping to edge dresses. This is also refered to as French Knitting. (In Germany they're called Nahliesle.)
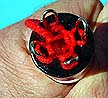
Knitting Nancys are four-prong variants of the lucet.
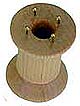
Versions like the one pictured above used to be made out of wooden thread spools, something difficult to do in these modern times since thread spools are now plastic. (Craft stores sometimes carry wood spools.)
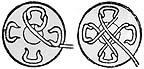
Yarn is fed down through the hole and left to hang. Sometimes a weight is clipped to the knitted braid, which actually a tube, to help pull it down. (There are more photos and explanations of the starting and knitting process farther down this page.) The yarn is then wrapped in a four point figure eight around the nails. The following diagram shows the pattern for an advanced form of the knitting spool, which uses loops of wire instead of nails:
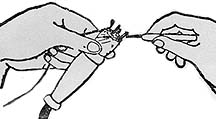
The knitting is then accomplished by holding the spool between the index finger and thumb while the yarn is held against the palm by the other three fingers. The incoming yarn is guided so that it lies above the yarn loops already wrapped around the nails or prongs. The spool is given a quarter turn, a needle is used to carry the loop up and over the nail or prong, and the knitted yarn trailing down the hole is given a tug.
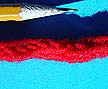
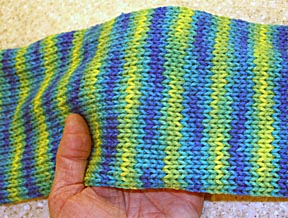
Repeat the process of carrying a loop over a nail 400 times and you'll have a foot of braid. After making yards of braid, it can be used to make trivets, appliques, dolls, and so on. These braids are also called "horse reigns."
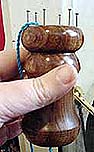
Knitting Nancys come in many shapes and sizes.
 ...
...  ...
...  ...
...  ....
.... 
There's no rule that there can't be more than four prongs or pegs on a Knitting Nancy, as this six prong version from Sarah Bradley shows:
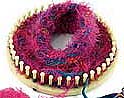
For knitting socks and caps Knitting Nancys are shaped in rings with up to 41 pegs. I've seen these rings sold in sets of four different sizes in Micheal's craft stores.
Rake knitters, a board with a straight line of nails along one edge, can be thought of as a Knitting Nancy that has been unwound and laid flat. Knitting rakes produce a flat rectanglar sheet of weaving.
There's even a crank type Knitting Nancy that produces braid at the incredible rate of a yard a minute.

Years ago I saw a television commercial offering a twenty-prong, hand-cranked Knitting Nancy that produced tubes three inches in diameter.
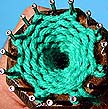
My Spool:
Once I'd given these knitting tools a try, the engineer in me demanded that I attempt to push the technology. The first step was to make my own knitting spool. Being untalented in woodworking, I looked around for something ready made for the spool's body. I found it in the local hardware store: a replacement leg to a table. It only cost $3.00.
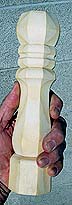
The central section was the perfect shape, so I cut off the top and bottom, drilled a 3/4-inch diameter hole down it's center, routed and sanded the opening so the yarn would flow down through the spool easily, gave it a quick coat of glossy stain, and hammered sixteen finishing nails into the top. Here is the result:
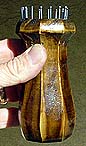
It may not be beautiful, but it's comfortable and works.
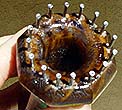
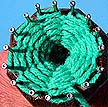
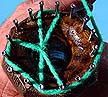
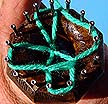
This close up of the business end shows the first difference between this design and all the others I've seen: many more nails. The reason is that I wanted a spool that would enable me to knit several different numbers of runs (One peg creates one run. The standard Nancy has four pegs so it knits a tube with four runs. More pegs means more runs resulting in a larger diameter tube.) The large numbers of pegs also allows me to experiment with increasing and decreasing the numbers of runs in a project.
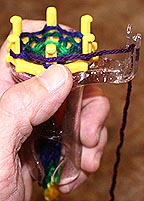
To start a typical 4-peg braid, yarn is fed down the central hole and wrapped around two nails that will act as a single peg.
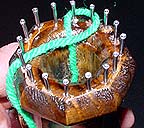
Next, the yarn is continued around three other pairs of nails, leaving an unused pair between them, to create a four-sided figure eight.
If the knitting spool was a conventional design with four pegs, the yarn would be wrapped around all of them to create the same pattern.
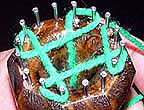
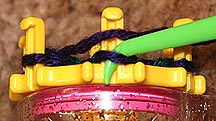
The knitting stroke is completed by holding the yarn against the nails so that it lays above one of the loops already on the nails. A knitting needle grabs the outside of the bottom loop-
-and carries it up and over the yarn above it.

A tug on the strand of yarn trailing out of the bottom of the spool draws the yarn down and sets the stitch.
The yarn that was positioned above the first loop now becomes the lower loop for the next time the knitter comes around to this position. The yarn is held above the next loop and the process repeated. In the case of normal knitting spools, there are only four pegs which simplify the process. In the case of my knitter, I have to be careful to keep the yarn outside of the pairs of nails I'm using and inside the pairs that I'm not using.
Here's video
showing how to thread a Knitting Nancy
The first three turns of the spool are the hardest. After that, enough of the braid has been knitted that it helps hold the loops in place.
I used finishing nails for this spool because it seemed their small smooth heads would make it easier to carry the lower loops up and over the yarn. They do, but they also make it easier for the yarn to be pushed off in the process. Flat head nails would hold the yarn better, but make the carry-over more difficult. If you plan to make your own spool, experiment with both and see which is easier for you to use.
Different Stitches:
My spool is trickier to use that a straight forward four-peg spool, but it's adaptability more than makes up for the inconvenience of having to keep track of which nails to use and which to skip. Here's a pictorial survey of the different stitches it can do:
 A
one-run (or peg) stitch and the braid it makes.
A
one-run (or peg) stitch and the braid it makes.

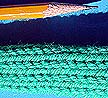
 A two-run stitch and braid.
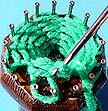
 A four-run stitch and braid. At this point I noticed that the braid
my knitting spool produced was looser than that produced by normal
sized spools
A four-run stitch and braid. At this point I noticed that the braid
my knitting spool produced was looser than that produced by normal
sized spools
 A four-run stitch and braid from a normal sized spool.
I attribute the difference in braid looseness to the fact that the pegs on my spool were placed on a circle 1 and 1/2-inches in diameter whereas those on a normal spool are on a circle 3/4-inch in diameter.
 An eight-run stitch and braid. The tube produced is large enough to
stick a finger in it.
An eight-run stitch and braid. The tube produced is large enough to
stick a finger in it.
 An eight-run stitch can also be done using one nail for each peg, but
the lower loops are much harder to pick up and carry over.
An eight-run stitch can also be done using one nail for each peg, but
the lower loops are much harder to pick up and carry over.
I attempted a 16-peg stitch, but the loops were too hard to pick up and carry over on my size spool.
Increasing and decreasing stitches:
With a multi-peg spool it's easy to increase or decrease the number of stitches.
To increase:
For this example I'm increasing from two to four runs or pegs. The
principle is the same regardless of the starting and finishing number
of runs.
 The first step is to wrap the yarn over the new peg to be added to
the stitch, in this case the two nails on the left. Then skip the
next peg, if there is one (the two nails at 7 o'clock on mine), and
wrap it over the bottom peg as you would for an ordinary stitch.
The first step is to wrap the yarn over the new peg to be added to
the stitch, in this case the two nails on the left. Then skip the
next peg, if there is one (the two nails at 7 o'clock on mine), and
wrap it over the bottom peg as you would for an ordinary stitch.
 Make the stitch at the bottom and wrap the yarn
around the next peg to be added in, in this case the two nails on the right.
Make the stitch at the bottom and wrap the yarn
around the next peg to be added in, in this case the two nails on the right.
 Wrap the yarn
around the peg at the top and make the stitch.
Wrap the yarn
around the peg at the top and make the stitch.
Now simply continue stitching, treating the added pegs as if they
were always part of the braid by carrying the lower yarn up and over
the new yarn wrapped above tham as you knit.
To decrease:
 This is even easier and done in one step. Being careful to ease up on
the tension so nothing unravels, pick up two loops next to each other
and place them other the same peg. Continue knitting as before. When
you get to the peg with two loops on it, simply be sure to carry both
loops up and over the yarn. In this case I'm reducing an eight-peg
braid to a seven-peg braid.
This is even easier and done in one step. Being careful to ease up on
the tension so nothing unravels, pick up two loops next to each other
and place them other the same peg. Continue knitting as before. When
you get to the peg with two loops on it, simply be sure to carry both
loops up and over the yarn. In this case I'm reducing an eight-peg
braid to a seven-peg braid.
Closures:
The instructions that came with my Knitting Nancy said that a braid is finished off by passing the yarn through each of the loops, either while they are still on the pegs or after very carefully removing them, and pulling it snug. This works, but closes off the end of the tube that is the braid. If you're working an eight-peg braid, it would be nice to be able to close it off so that the end remains open. This way it could be stuffed or rolled inside out. To do this, proceed as with the first closure method, but instead of drawing the yarn tight to pull the loops together, loop it one more time through the first loop you passed it through and tie it off to that loop using a couple of half-hitches.
Testing the Wyr Knitter:
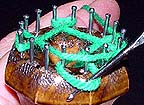
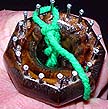
The Wyr Knitter is a Knitting Nancy designed to use 30-gauge wire to make jewelry. It looks like and operates exactly the same as a normal Knitting Nancy and a regular Nancy may do the trick, except two of the needles on mine tended to hang up on the wire.
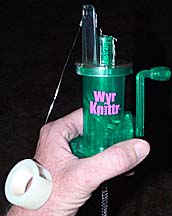
The Wyr Knitter. You can see the braided wire hanging out of the bottom. I found the Wyr Knitter harder to turn than a Knitting Nancy and it tended to miss stitches more often.
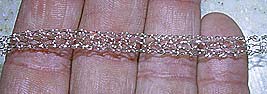
The wire chain is a loose tube slightly larger in diameter than a pencil.
This wire tube can be crushed very easily by squeezing it between the forefinger and thumb.
One spool of the wire sold for the Wyr Knitter produces a 3-foot long braid. Although attractive, the braid by itself is so soft that it is easily squashed. I doubt that it would make very durable jewelry. Some options would be to press beads or sequins into the braid as it's being woven so that they are incased in the tube or to weave the tube around a cord.
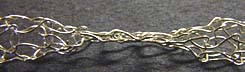
Wyr Knitter Update: Beverly Smith very kindly sent me an email explaining that the chain tubes from Wyr Knitters should be pulled through progressively smaller holes in a draw plate to make them more compact and less likely to crush. (Thanks, Beverly!)
Wyr knit around yarn!
Another way to make the chain more resistent to crushing is to knit it around doubled or tripled yarn so that the outward pressure of the yarn supports the wires.
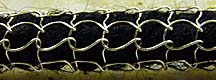
Cording would be even better. Simply start the Wyr Knitter as usual and then push in the end of a length of cord or yarn. Start cranking and the cord will be pulled in and enveloped in wire mesh. The problems are that the cord tends to twist so it's necessary to stop and unwind it from time to time and that the cord highlights any flaws in the wire mesh.
NEW ARTICLE School-safe Knitting Nancies!
One of the reasons the craft of Knitting Nancies is being lost is that modern school safety codes prohibit children from bringing knitting needles or crochet hooks to class. There's an easy and inexpensive way around this, which may be of interest to teachers looking for a new craft for their students: make Knitting Nancies out of popsicle sticks.
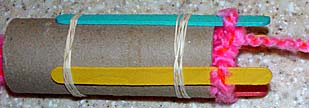
Simply rubberband four popsicle sticks around a toilet paper roll leaving 1 inch of the sticks extending above the tube. A fifth popsicle stick works fine as the knitting tool. As long as the child avoids sitting on the tube and crushing it these knitters work great. In one way they are better than the smaller wood versions: they can handle very thick yarn.
Using the largest yarn I could find (Red Heart brand Super-Bulky) a standard 4-peg braid comes out over an inch in diameter. Unlike the braids from typical Knitting Nancies, this one comes out soft and stretchy, not rope-like. The bulky yarn also increases the rate at which the braid forms.
This idea was given to me by Kyle Murray. (Thanks Kyle!)
Try Finger Knitting! Erica kindly emailed me the following link to a page explaining how to use your fingers for sheet knitting:
http://www.kidscanmakeit.com/AC0023.htm.
(Thanks, Erica!)
It is easy to see how this technique could be adapted to produce a chain like a Knitting Nancy.
A giant-sized, hand-cranked Knitting Nancy!
On 3 October, 2005, while strolling through the toy section of a Rite Aid variety store in southern California I spotted a hand-cranked, 22-pin Knitting Nancy for only $15.00. I couldn't resist so I purchased one.

It measures 9-inches in diameter and the same high. Although it was intended as a child's toy I was amazed by how well it worked, much better, in fact, than the more durable looking 4-pin hand-cranked knitter mentioned earlier on this page.
It comes pre-loaded with yarn so you can begin turning the crank as soon as the unit is out of the box. Mine ran extremely smoothly with little sound and no missed stitches. Turning the crank as fast as possible I could not get the unit to skip a stitch. At this rate it turns out a 3-inch diameter tube at the rate of a foot per minute. I churned out five feet in just a few minutes and could not find a single defect in the entire length.

A close-up of the 22-pin knitting
head, surprising durable
and reliable for something
completely made of plastic.
Short sections can be stuffed and closed to form balls, or left unstuffed and flattened to create rosettes that could be stitched together to form a quilt. Longer sections can be closed at one end to form caps, though they are too small for anything other than dolls or newborns. Long tubes can be stuffed to make snakes or left empty for narrow scarves. The diameter of the tubes is variable depending on whether the knit is stretched radially or lengthwise. I could fit my arm down it, though it was too tight to use for a sleeve. This might work for people with thinner arms.
Even more remarkable is that the unit has a lever which can be set to knit flat sheets. The crank is locked so that it only works in one direction for one revolution of the knitting head, then reversed. By alternating clockwise and counter clockwise cranking a 6-inch wide flat sheet can be knitted almost as fast as a tube.
The unit is very easy to thread and get started. All-in-all I have nothing but praise for this knitter.
I discovered that by taping the unit to the inside corner of a counter or between an opening between two desks the knitted tube or sheet is free to hang down and knitting can continue without stopping until 3 or 4 feet is done.
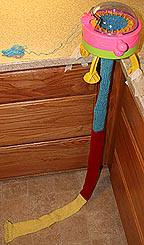
This is much faster than resting it on a table top where the clearance between the bottom of the unit and the table is only a few inches. Also, hanging a couple of hook weights on the knitting helps pull knitting down out of the knitter.
This knitter is called the Real Knitting Machine and has the logo Kids Stuff on the box. It is made in China and distributed in the USA by the company EXCITE, 2051 McKinzie Drive, Carrollton, TX 75006.
A Second Large Mechanical Knitting Nancy!

For Christmas of 2007 my wife gave me the Singer Knitting Machine, a hand-cranked, 20-pin knitting Nancy. It works the same as the unit above but feels like it's more sturdy. It is considerably harder to crank than the previous unit and although it works very reliably it grinds and complains as it's cranked. The tube it knits seems slightly larger than the Real Knitting Machine above. For myself, I prefer the previous unit.
One
interesting thing about using either of these machines is that when
I use a fuzzy or tasseled yarn the machine puts most of the fuzz or
tassels on the inside of the tube. Such being the case, it's
necessary to turn the tube inside out for the best effect.
Beading Nancy
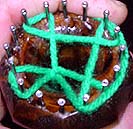
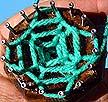
The Bead Shop in Milwaukee, WI, markets a Knitting Nancy called the EZ2 Quikrochet Kit advertised to make beautiful beaded bracelets and necklaces using their specially designed Knitting Nancy. I found the claims to be grossly inaccurate.

Following their instructions to the letter and then attempting a modification of my own I couldn't get anything that anyone would want to wear:
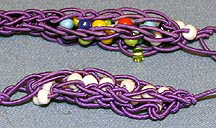
In both the double-bead stitch they recommend (bottom) and the quadruple-bead stitch I invented (top) the resulting chains have the beads imbedded too far inside the stitch to be seen clearly. The stitches come out looking very rough and uneven. Worse still, half of the beads provided had holes that were too small for the string that was supplied. Manipulating the beads is time consuming, doubling the time it takes to knit a length of stitch over a regular Knitting Nancy. The hole in the Knitting Nancy was also a little too small for easy stitching.
Upon closer inspection of the box, the images on the cover of attractive bracelets aren't even stitches made on the Knitting Nancy but a chain stitch mentioned at the back of the manual.
The only positive think I can say about this kit is that the pictures in the manual showing how to use the Knitting Nancy were very clear.
All in all I cannot recommend this kit.
NEW!!!
THE INNOVATION KNITTING MACHINE
Amazon.com sells the largest mechanized Knitting Nancy I've ever found.

Compared to the others I've tested this one's a monster.

It's sturdily built and cranks smoothly. Baby yarn produces an open stitch whereas number 4 yarn is tight and solid. The resulting tube is large enough to use as a sleeve to a sweater.
The trick with this machine is to get the tension just right. Too loose and it drops stitches like crazy, and although directions are provided for fixing these in practice it's almost impossible to do so. If the tension's too tight the machine stops dead. Tension is controlled by the number of times the yarn loops over and under the arms in the blue plastic circular guide seen in the lower left of the second image above. Yarn must be feed into this guide at zero tension so that all the tension created comes only from the guide. This adjustment is so sensitive that I highly recommend making a test tube out of whatever yarn will be used for the final project to figure out how many loops are needed so the machine knits without dropping stitches. In my tests I found smooth baby yarn needed five loop and number 4 yarn required 4. Once I got the tension right I was able to crank out a tube without a single error. But, the test piece prior to that was riddled with them. A 7-ounce skein of number 4 yarn produces a tube three feet long.
Like the previous two large knitters, the Innovation knitting machine can be used to knit flat sheets. At least that's what the instructions claim. I worked at it for several hours and couldn't get it to work reliably. The problem was that it would very often throw off a stitch at the end of one of the sides. Giving the yarn a little tug at the end of each stroke helped prevent this but this requires painfully alert vigilance. Perhaps others have had better luck with this but for myself I recommend avoiding this option. Besides, the resulting sheet rolls up into an unbelievably tight roll when removed.
Finally, as with the other large machines the legs are woefully inadequate and far too short. Still, I had fun with it. The Innovations Knitting Machine is worth the $40 cost if for nothing else than as a curiousity.
This video shows several modifications that make this machine work much better.
NEW KNITTING NANCY TESTED!!!

I discovered this new Knitting Nancy in a Michael's craft store in late September of 2006. It only cost $8.00 (on sale for $5) and I'm happy to report that in every way it is the best Knitting Nancy I've ever used. It's the Wonder Knitter by Clover manufacturing. (www.clover-use.com)
Instead of having to constantly rotate the body as in regular knitters, with the Wonder Knitter you use a thumb or finger to turn a disk on which the knitting pegs are mounted. This feels a little awkward at first but you soon get used to it.
The handle design is extremely comfortable. The best features are the beautifully designed knitting pegs that have a lip on the outside edge that holds the new loop in place as you lift the old loop up and over it.
The knitting pegs also have a groove cut into the outside face that makes picking up loops much easier than flat pegs. Equally important is the outstanding design of the needle supplied with the knitter. Its scythe-shaped end picks up loops fast and clean and lifts them over the pegs easier than any other knitter I've used.
All combined, the superior design of the Wonder Knitter enables you to knit at two to three times the speed of conventional knitters and with more comfort. It also comes with two, easily changeable knitting wheels: one with three pins and one with six
In spite of it's very reasonable price, the Wonder Knitter is sturdily built and durable enough to last for years. I heartily endorse this product.
If you have one of the crank-type knitting Nancies and want a fun project, try the following video, which shows how to make pens covered with braid:
Where to purchase Knitting Nancys:
Here
are URLs to sites that sell Knitting Nancys:
http://www.goodwoodlooms.com/knitting_spools.htm
http://www.halcyonyarn.com/knitandcrochet.html (This site offers large ring versions with 18 to 41 pegs. They're used for knitting socks and hats.)
http://www.rosiehippo.com/productdetail1.asp?groupnumber=K107
http://www.newvoyager.com/nancys.html
http://www.allsuperstore.com/hearthsong/knitting-mushroom-yarn-pack.html
http://www.rosiehippo.com/productdetail1.asp?groupnumber=K600
http://www.lacis.com/catalog/data/descn_j.html (Has both manual and mechanical types toward the bottom of the page.)
http://www.thewoolery.com/knitting.html
www.cedarhollow.net/html/spools2.html
http://www.pellatuliptime.com/lessons/straw/strwcork.html
http://www.mielkesfarm.com/knit_tls.htm (Has the hand crank version.)
http://www.kidscanmakeit.com/AC0011.asp (Offers a book on corking, the term for creating braids using a Knitting Nancy.)
http://community-2.webtv.net/sari56/IrisKnittingLoomand/ (A short page loaded with links to Knitting Nancy sites.)
How I got interested:
If you're wondering how an manly engineer like myself became interested in Knitting Nancys, it was the result of a fad that swept Columbus Elementary School in Glendale California way back in 1959. I was in third grade and all the girls in the school started bringing Knitting Nancys to work with during lunch and recess. They'd huddle in tight groups, needles clicking away as they produced braids by the mile. The social hierarchy for each group appeared to be determined by who had the longest and most wildly colored braid. My youthful machismo kept me from showing enough interest to find out what they were doing, but for some reason the image imprinted itself permanently enough on my memory to carry forward into middle age. One day, unbidden, it resurrected itself and I had a sudden urge to find out how they worked. A call to my mother gave me the name for the knitting tool and the Internet provided the rest.
I titled this page as The Lost Art of Knitting Nancys because back in the late fifties it seemed like every grade school girl was doing it. Today my wife, who has been a grade school teacher for the last eleven years, says that she's never seen a single girl using a Knitting Nancy or bringing in a braid from one.
Thank
you very much for taking a look at this page. I've had a lot of fun
researching and figuring out how Knitting Nancys work and putting
together this page.
![]()
Please click HERE to visit my main site and browse 90 other pages.